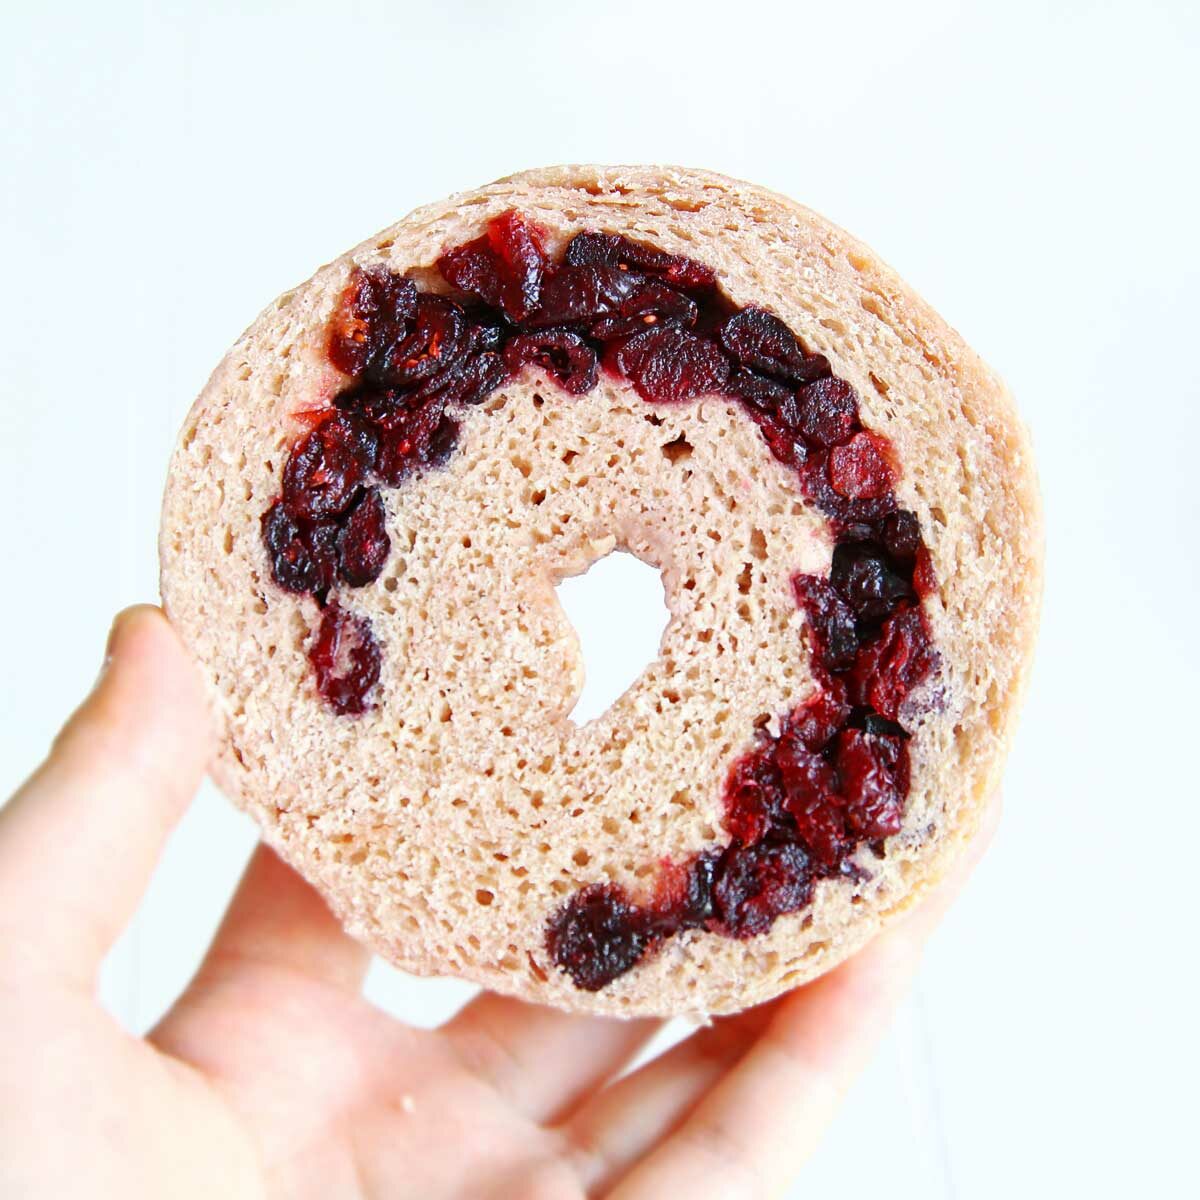
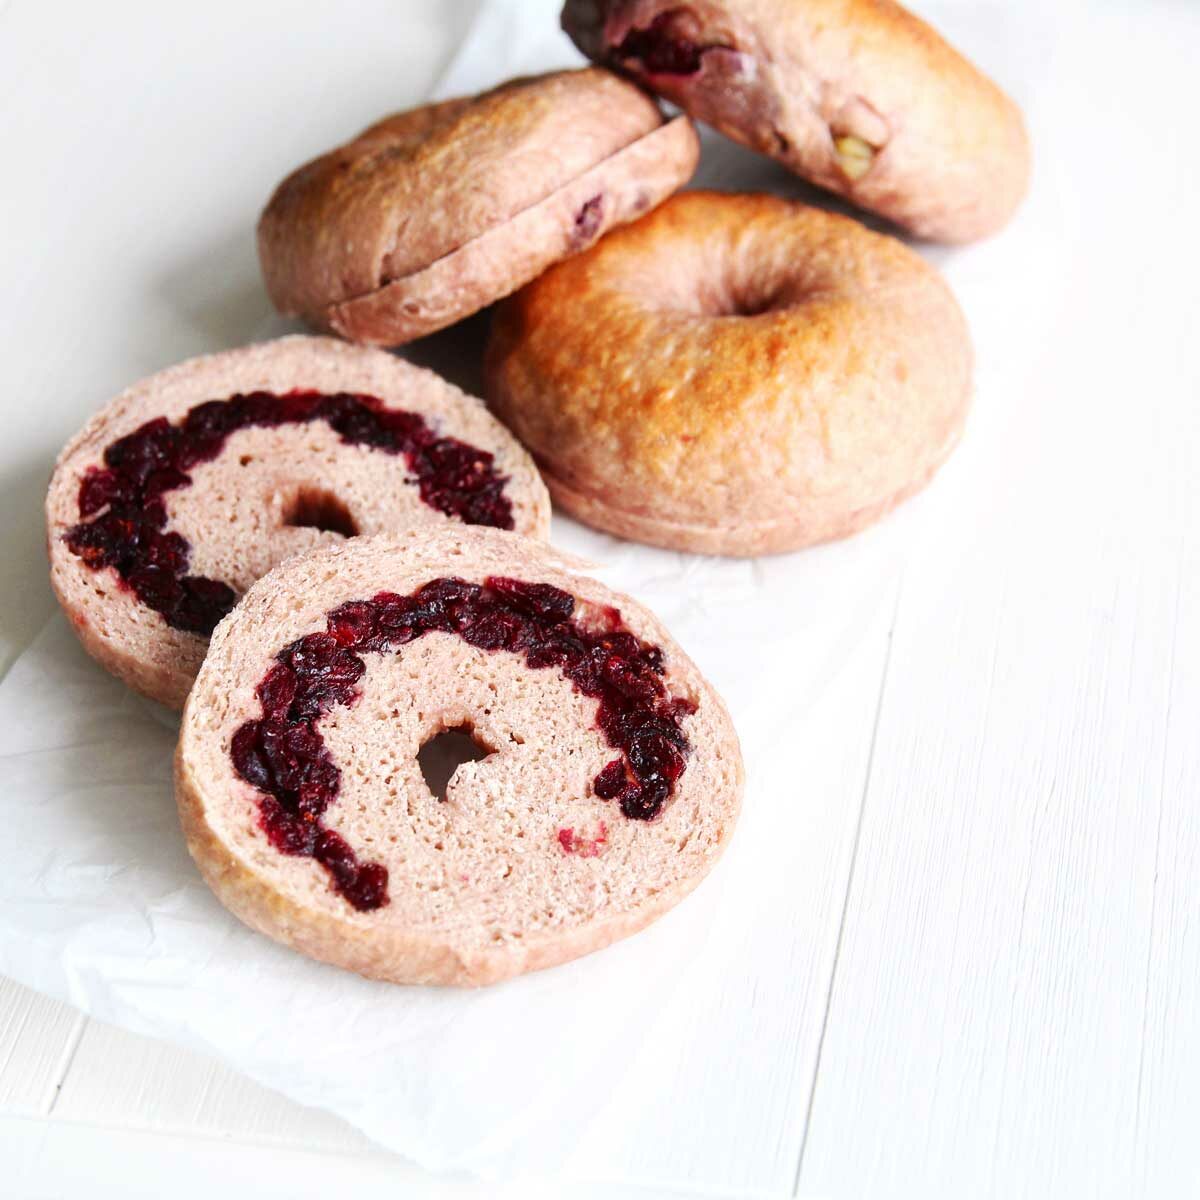
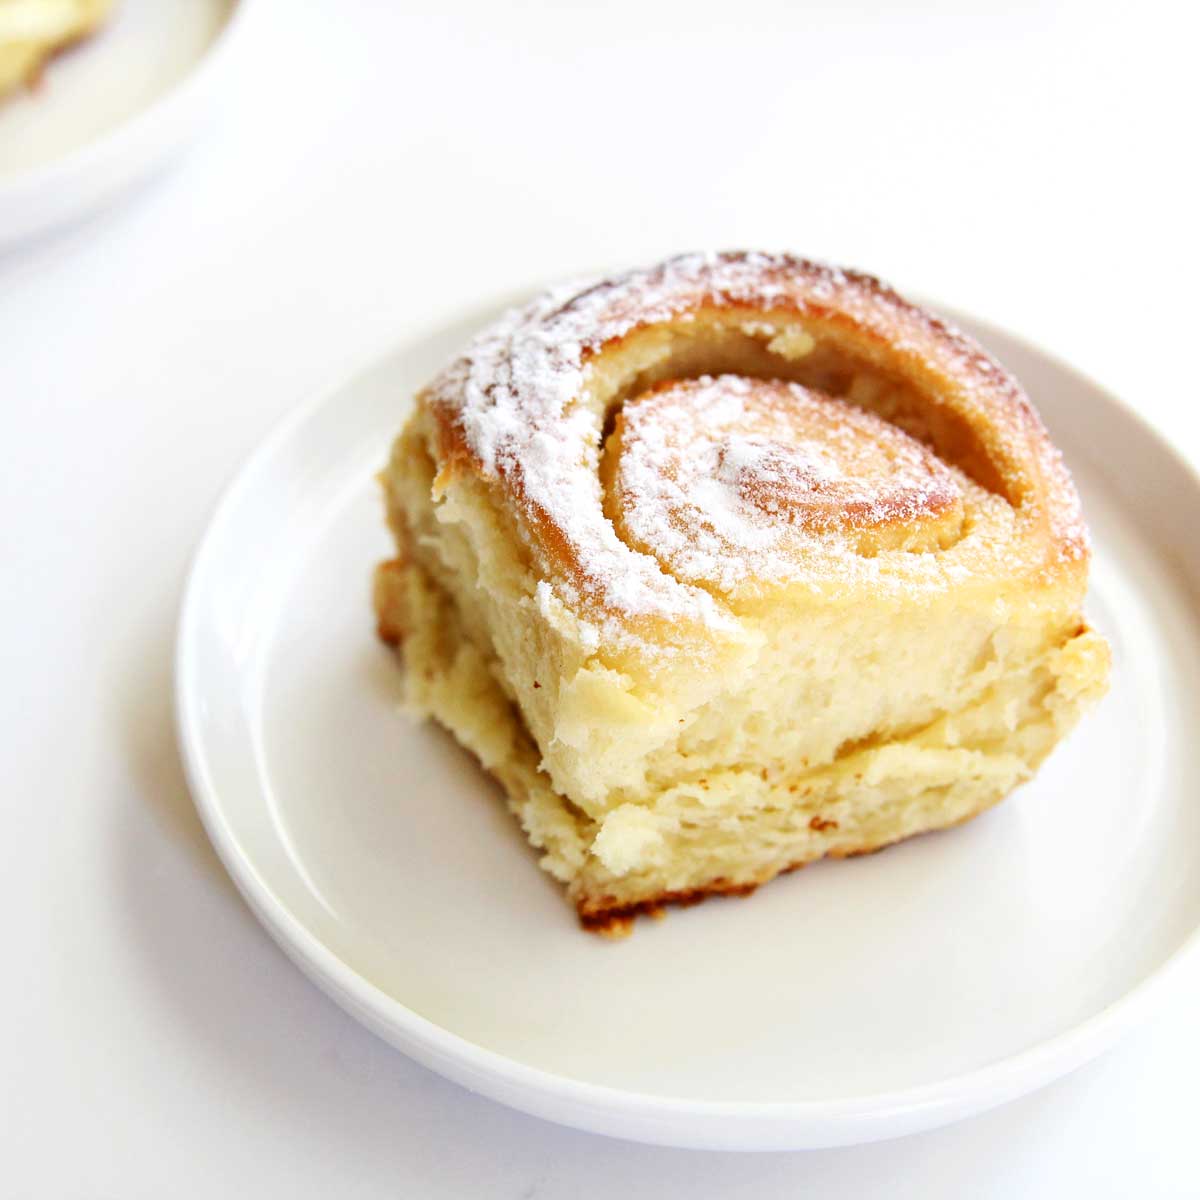
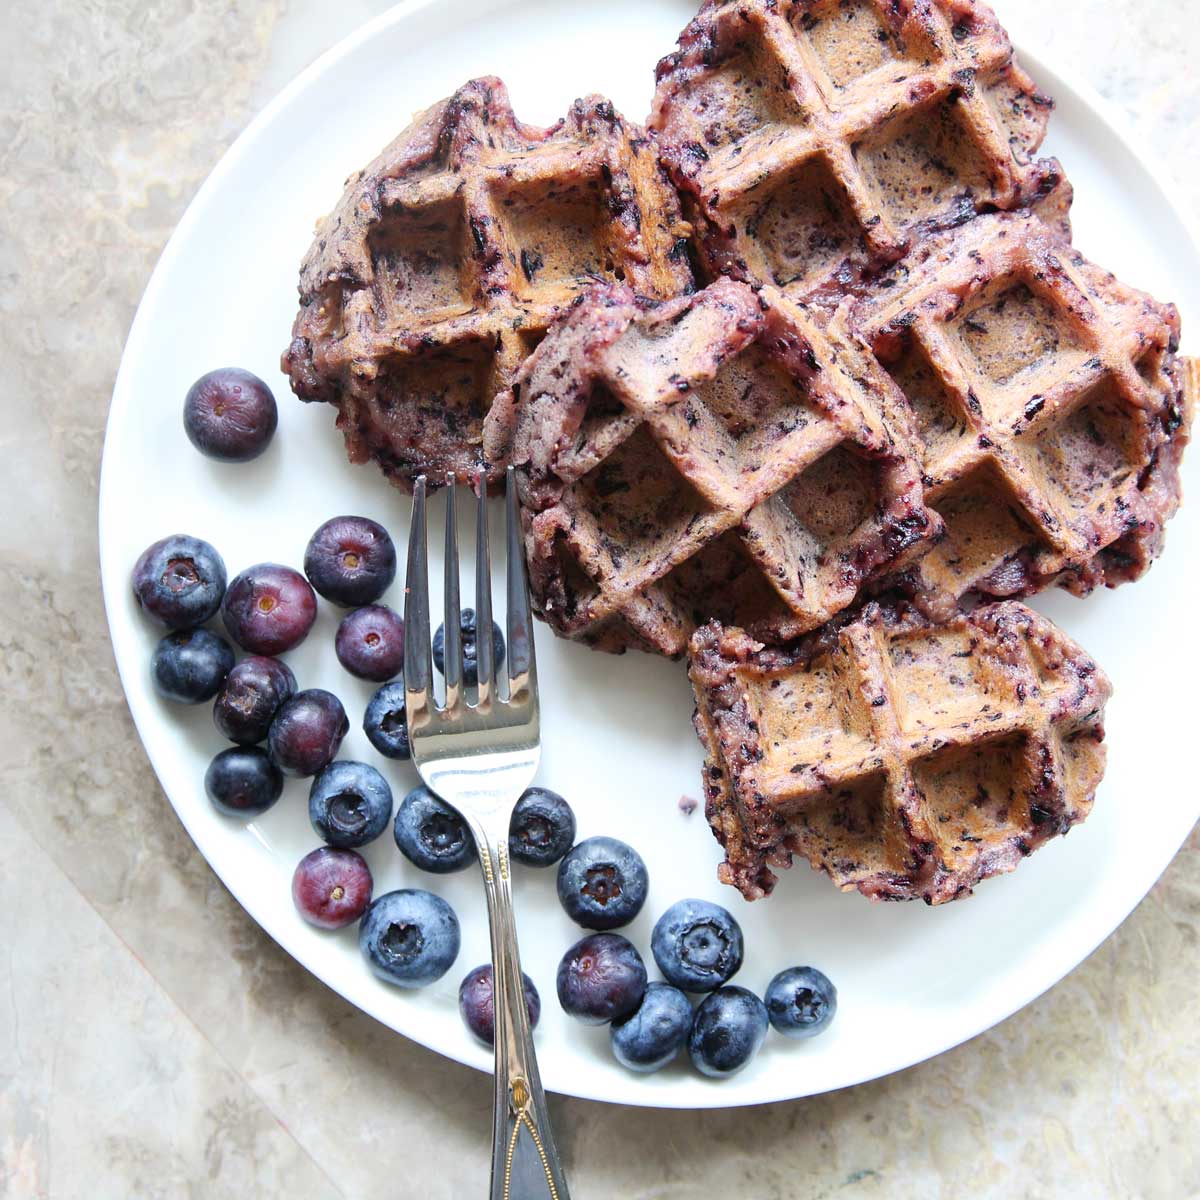
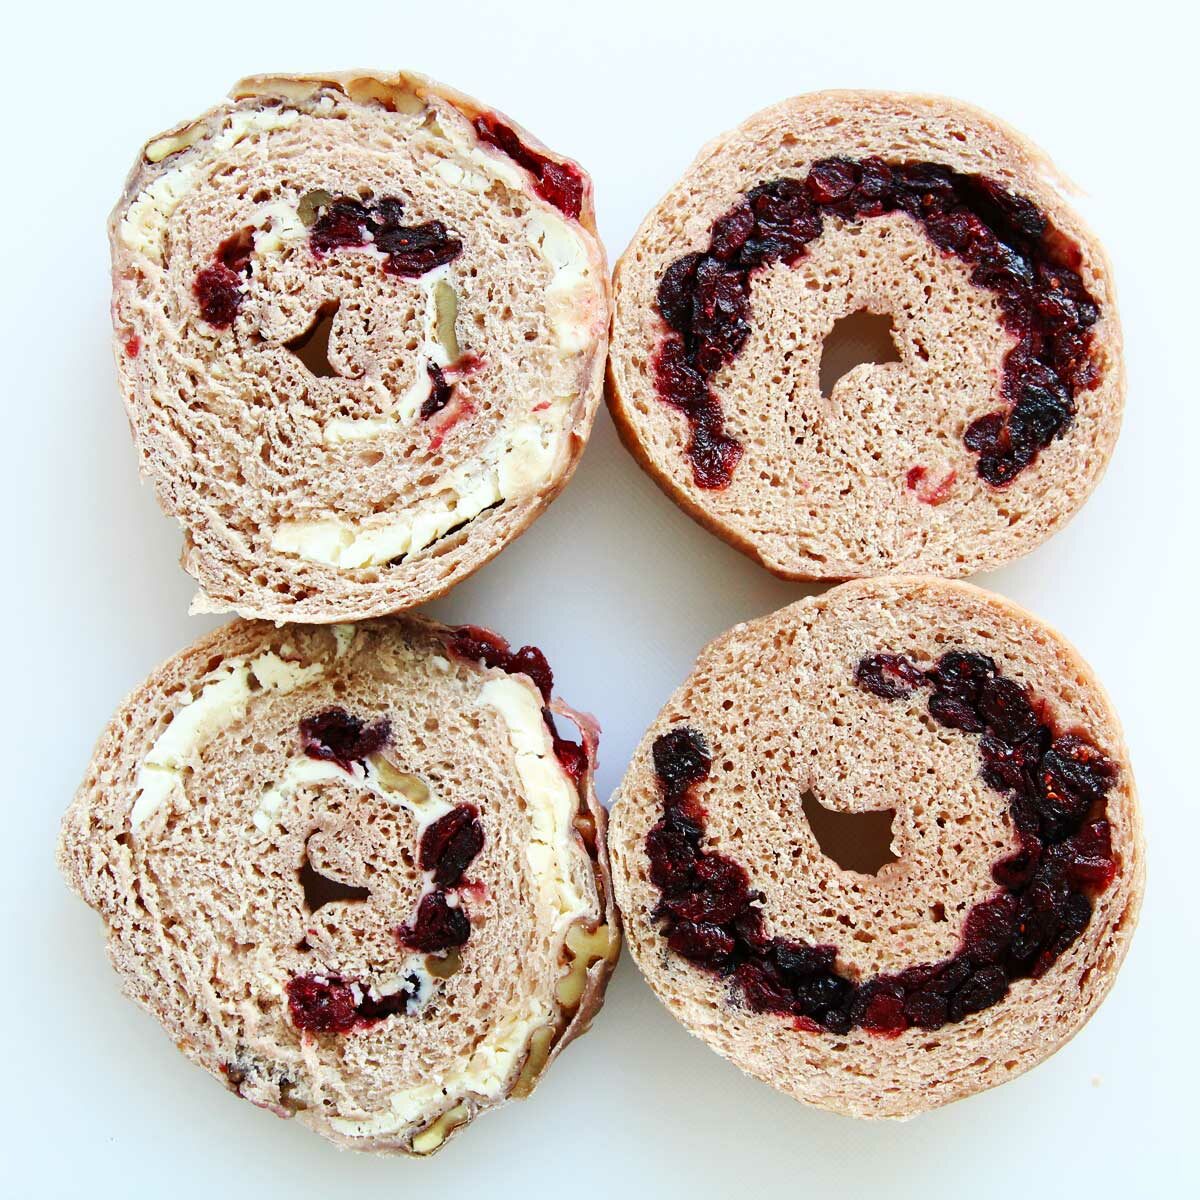
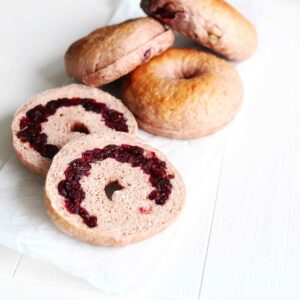
Cranberries are sweet, tart, and almost as pretty as rubies — there’s no other way to describe the northern fruit, and just how pretty they are stuffed inside these pink stuffed cranberry bagels. Tart, chewy and a bit juicy, these beauties have the nicest fruitiness and color. And the main ingredient? Canned Jellied Cranberry Sauce.
Here's why I love this recipe
- No eggs, milk or butter and vegan friendly!
- The added almond flour gives these bagels a rich, buttery flavor.
- Minimal kneading is required, and the stuffing part is actually fun to make.
- There's a good source of antioxidants, vitamin and fiber, thanks to the cranberries and added almond flour
Ingredients Used to Make Stuffed Cranberry Bagels Recipe
**I've linked some of these ingredients to amazon.com to give you an idea of what they are, but you should also be able to find them in your local grocery store (usually, the baking aisle, or the natural & organic food section). They are also affiliate links, which means that I earn a commission as an Amazon Associate if you decide to purchase the items. The price will be the same for you, link or no link 🙂
- Bread Flour - Bread flour is highly recommended for this recipe for the best texture and structure. TIP: For the best texture and chew, use a higher protein bread flour like King Arthur Bread Flour. Please read the note in the substitution section below if using other flours.
- Almond Flour (optional)- I used blanched almond flour, but if you want, you can substitute the almond flour with more bread flour (more details on the recipe card).
Why almond flour? Almond flour is not a traditional ingredient for bagels, but I like adding it for the extra boost in flavor and nutrition. It also produces more tender (easier on your jaws) bagels which my family prefers.
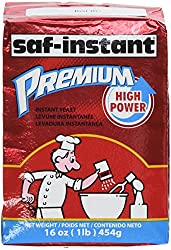
- Instant Yeast - you can find instant yeast in the baking section near the flours. My favorite is SAF Instant Premium Yeast, which works quickly and consistently produces great results. I recommend using instant yeast over active yeast for this recipe since active yeast needs to be activated in water.
NOTE: this bagel recipe uses more yeast than my other bagel recipes to compensate for the addition of cranberry sauce (which contains sugar and other ingredients that slow down yeast growth).
- Salt - Pink Himalayan salt is what I have at home, so it’s what I use, but you can use any kind for this recipe.
- Canned Cranberry Sauce (jellied) – you’ll need one (14 oz) can of jellied cranberry sauce to make this bagel recipe. You can use homemade cranberry sauce, as well as whole berry cranberry sauce instead, but you’ll most likely not need the extra water than the recipe calls for. To adjust, make sure you add the water at the very end, and only add 1 Tbsp at a time so you can stop adding when the dough is just combined.
Filling Ingredients
- Dried Cranberries - While this is not required, I soaked the dried cranberries in water for 10 minutes to make the cranberry filling inside the bagels more moist and soft.
More Breakfast Recipes (HERE)


Step by Step Guide
How to Make Stuffed Cranberry Bagels
STEP 1
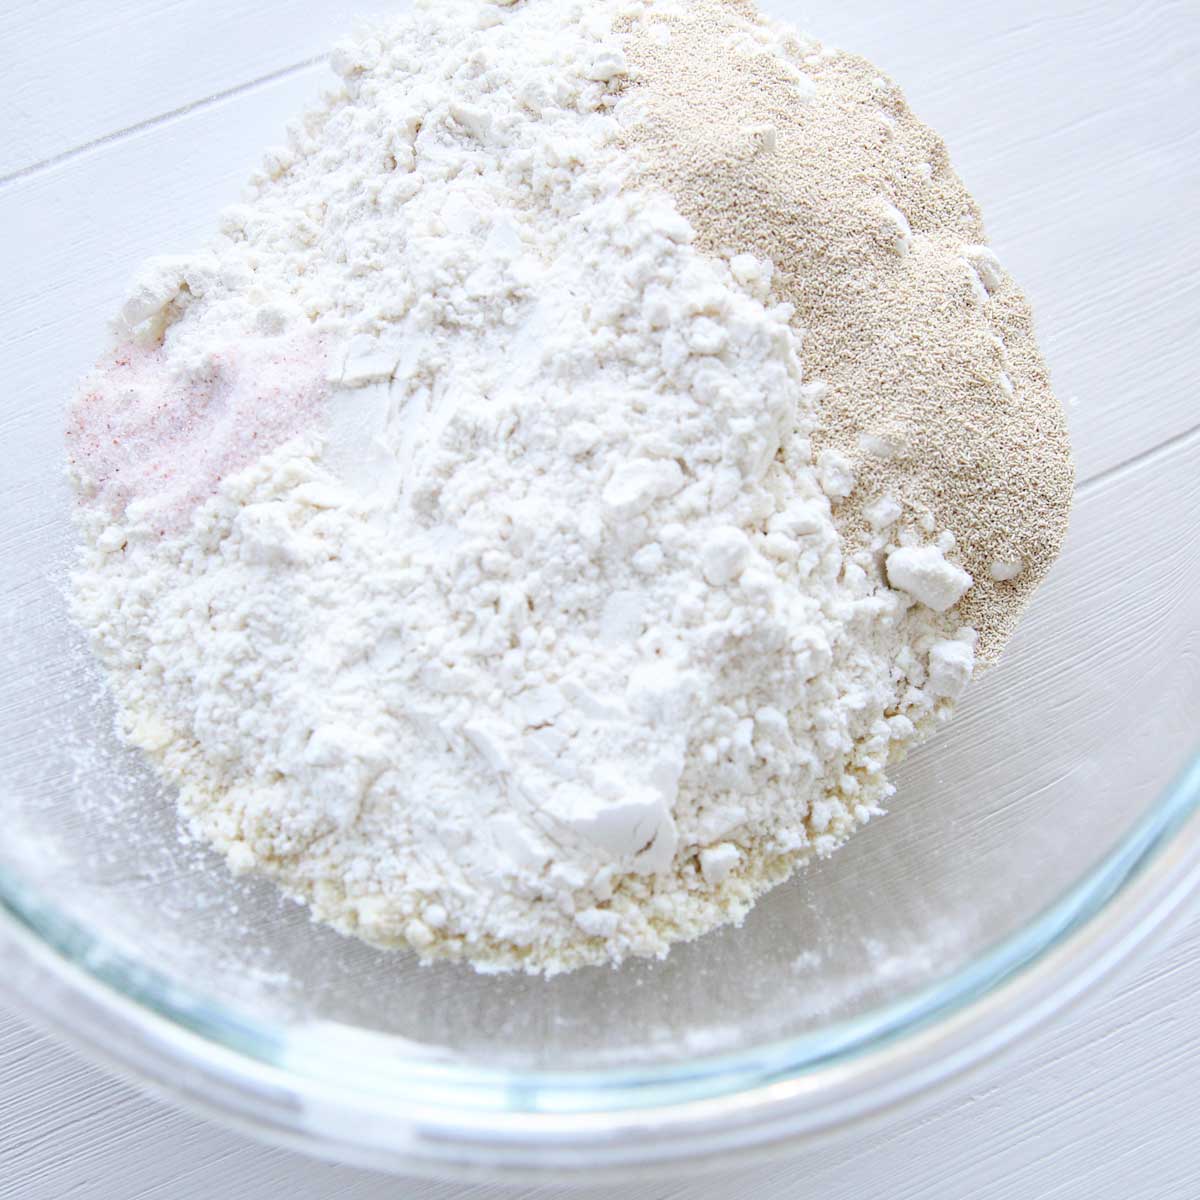
In a clean mixing bowl, mix the dry ingredients: the bread flour, almond flour, instant yeast, and salt.
STEP 2
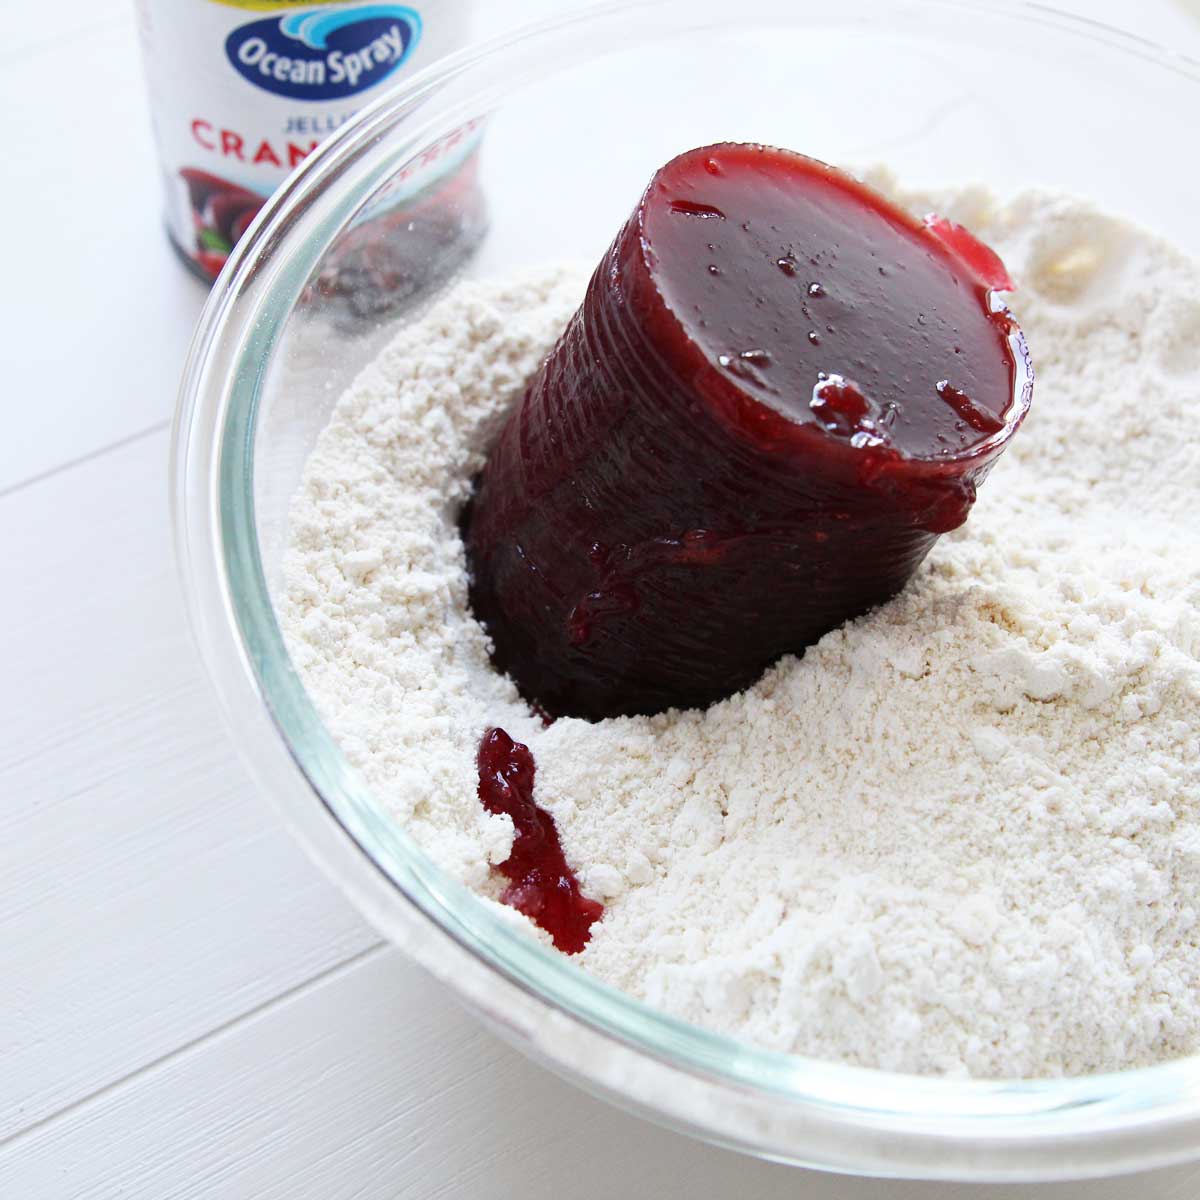
Once the dry ingredients are mixed, add the jellied cranberry sauce.
STEP 3
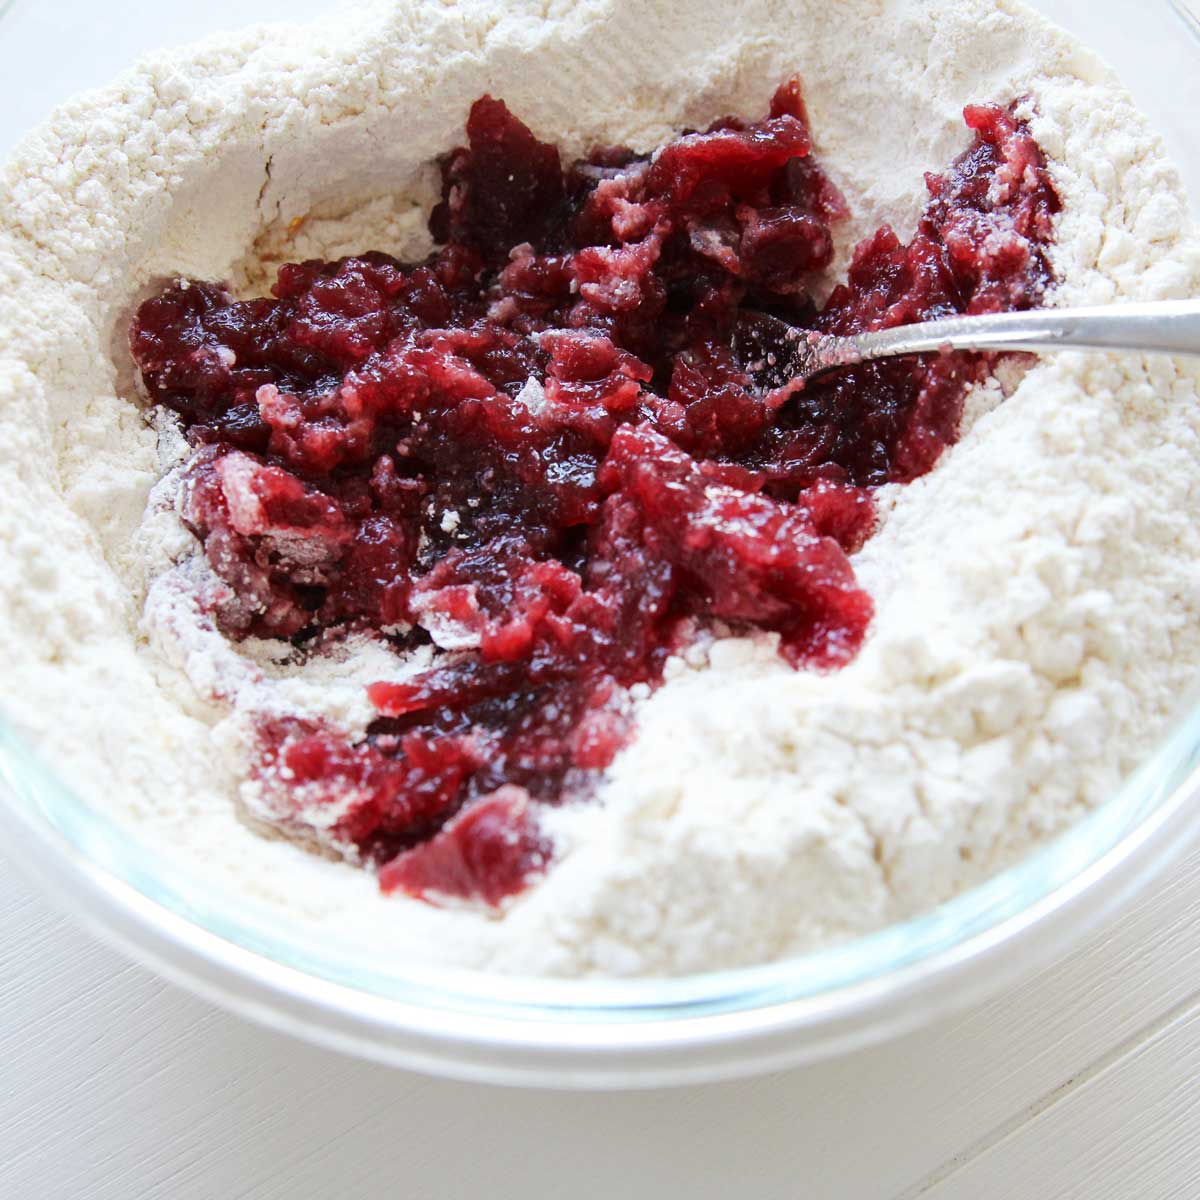
Use a fork to mash the jellied cranberry sauce into the dry ingredients and combine it with the dry ingredients best you can. Next, add water, 1 tablespoon at a time, until all ingredients are just combined. No kneading is required at this time.
*the bagel dough is supposed to be firm and somewhat stiff, since bagels require a lower water-to-flour-ratio. You can add additional 1-2 Tablespoons of water if there are still dry ingredients, but be sure to add one tablespoon at a time, so you don’t overhydrate the dough.
STEP 4
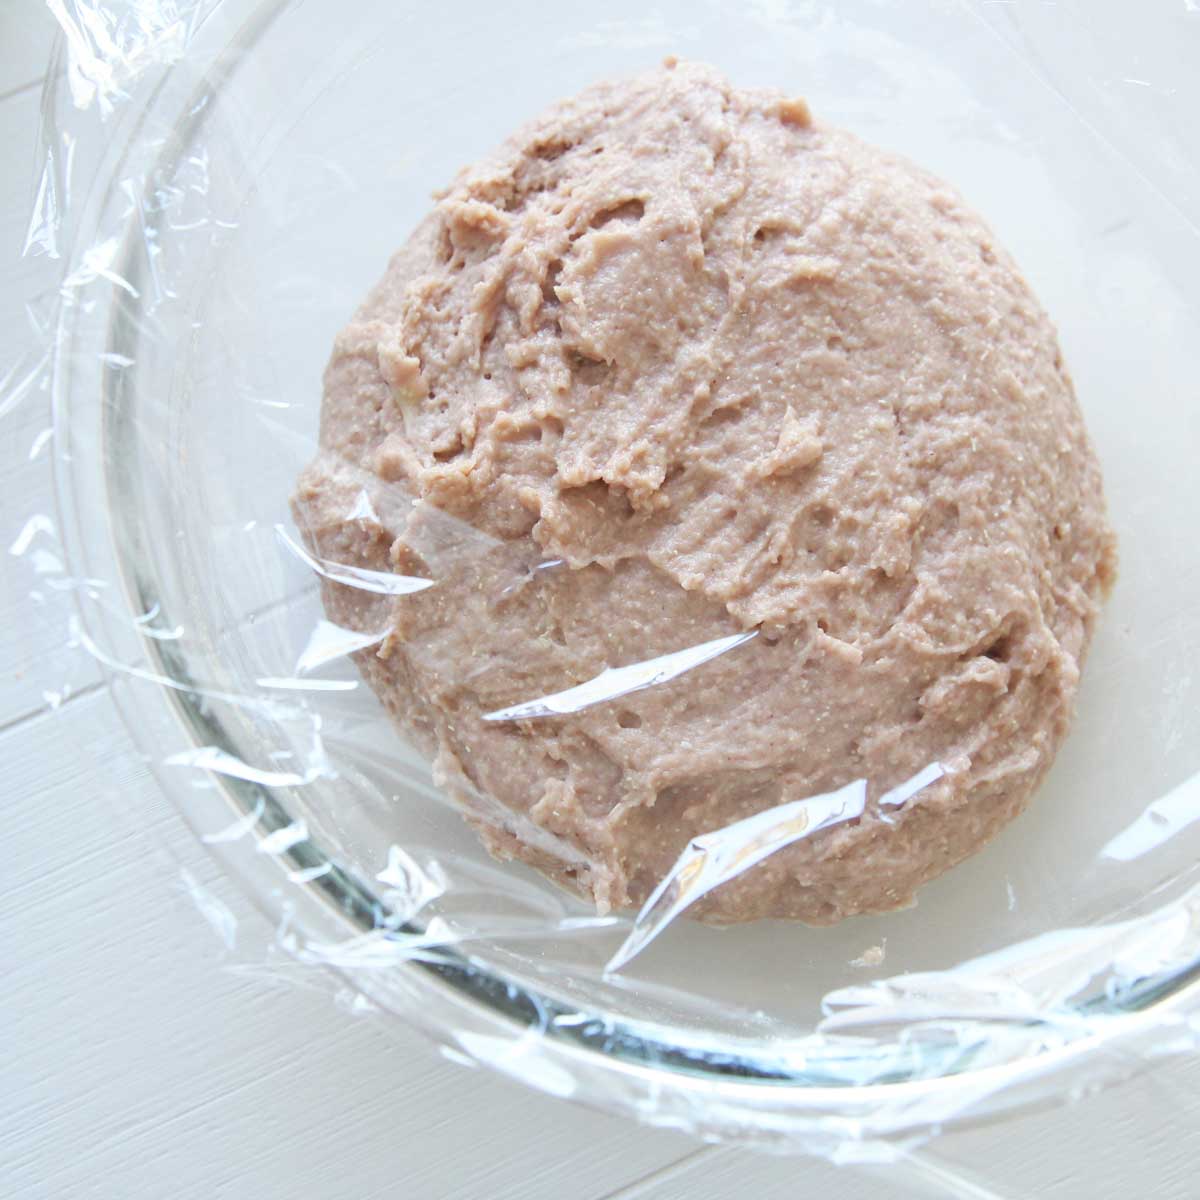
Loosely cover the dough with a clean wet towel or plastic wrap. Let rise, at a slightly warm place, for 60-90 minutes, until puffy.
STEP 5
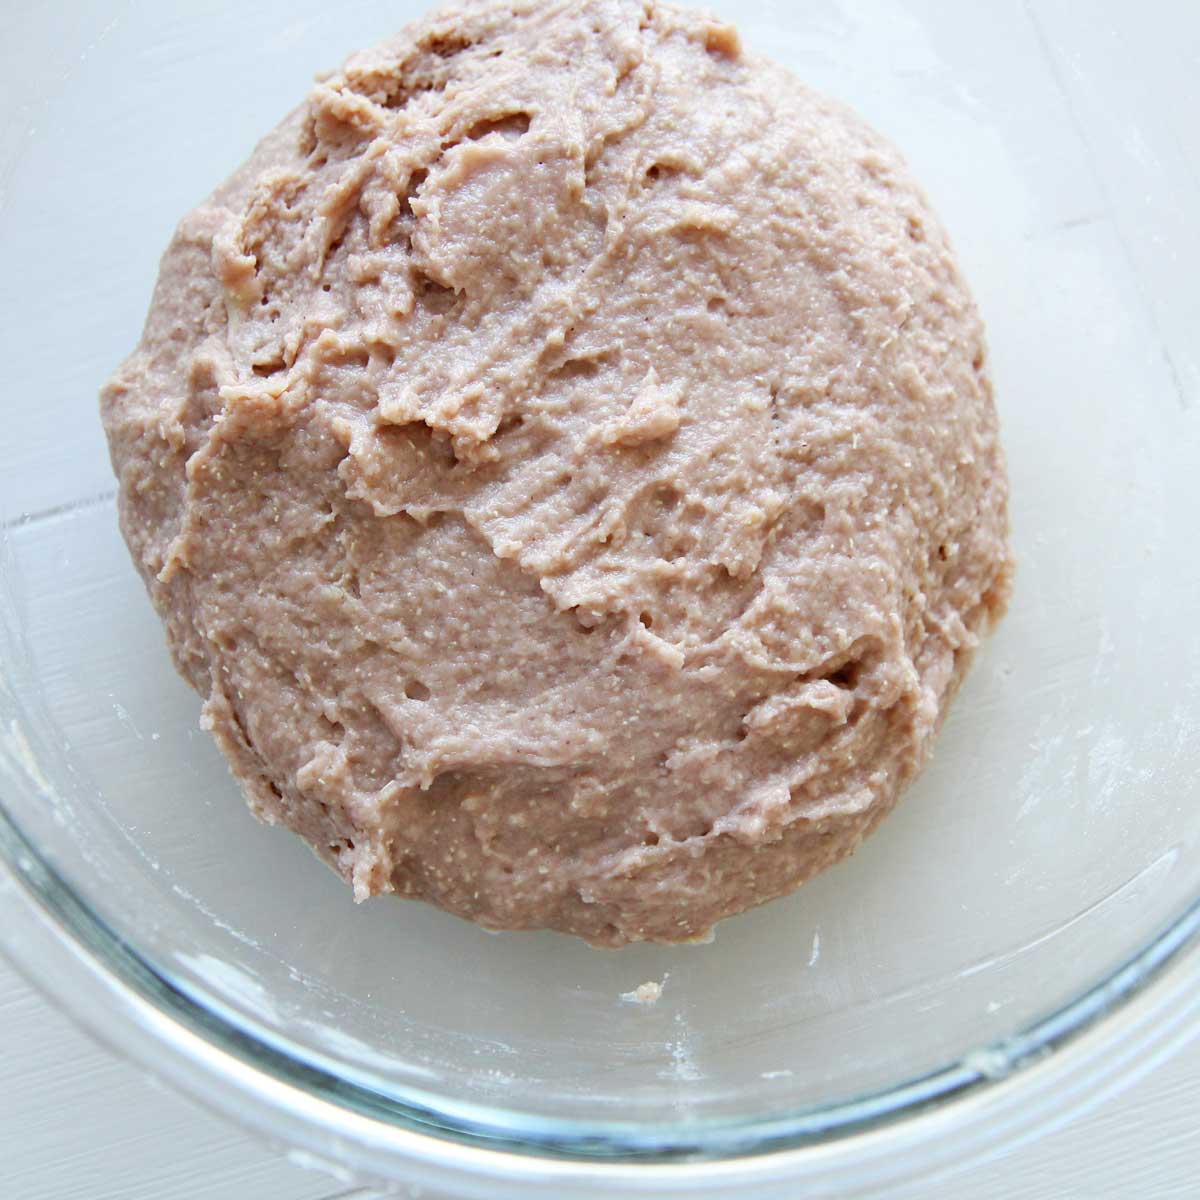
After the first fermentation stage, choose ONE of two methods:
For no-knead (overnight) method: gently deflate the dough, and cover the bowl with plastic wrap loosely so that air can escape. Transfer the bowl to the fridge and chill overnight, at least for 8 hours and up to 48 hours.
For kneaded (quick) method: continue to knead the dough by hand or using a stand mixer, until the dough becomes smooth, supple, and pulls easily away from the bowl. The kneading should not take too long (about 3 minutes by hand) since we allowed the dough to relax and hydrate in the previous step.
STEP 6
Gently place the prepared dough onto a floured surface. If you chilled the dough in the fridge overnight, let the dough first come to room temperature (about 3-4 hours) before proceeding to the next step.
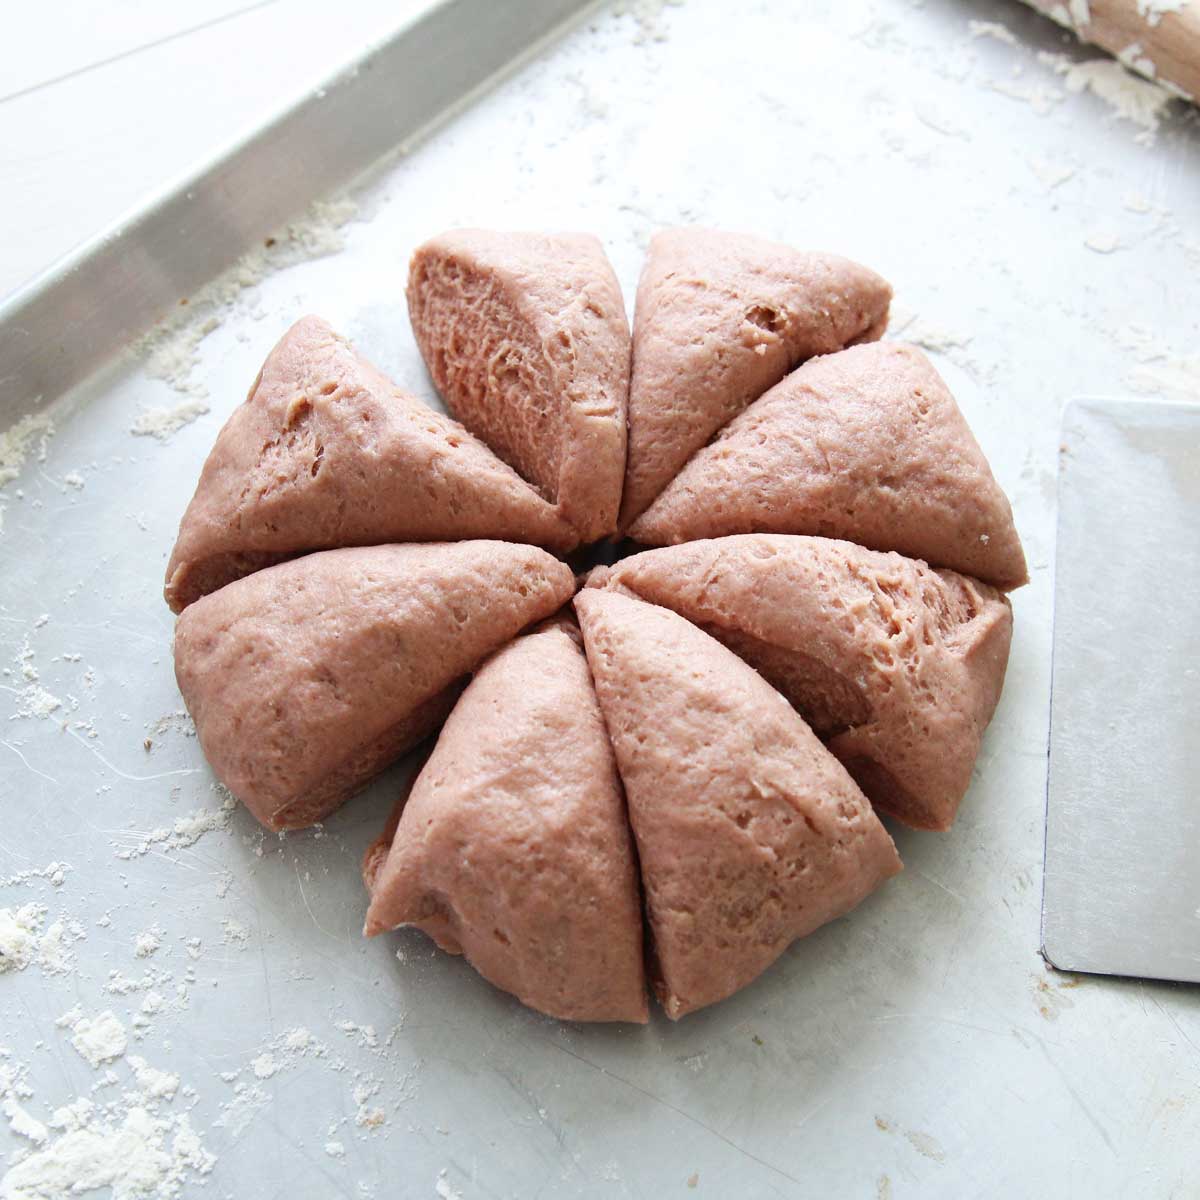
Shape the dough into a ball, and divide into 4 equal sized pieces
STEP 7
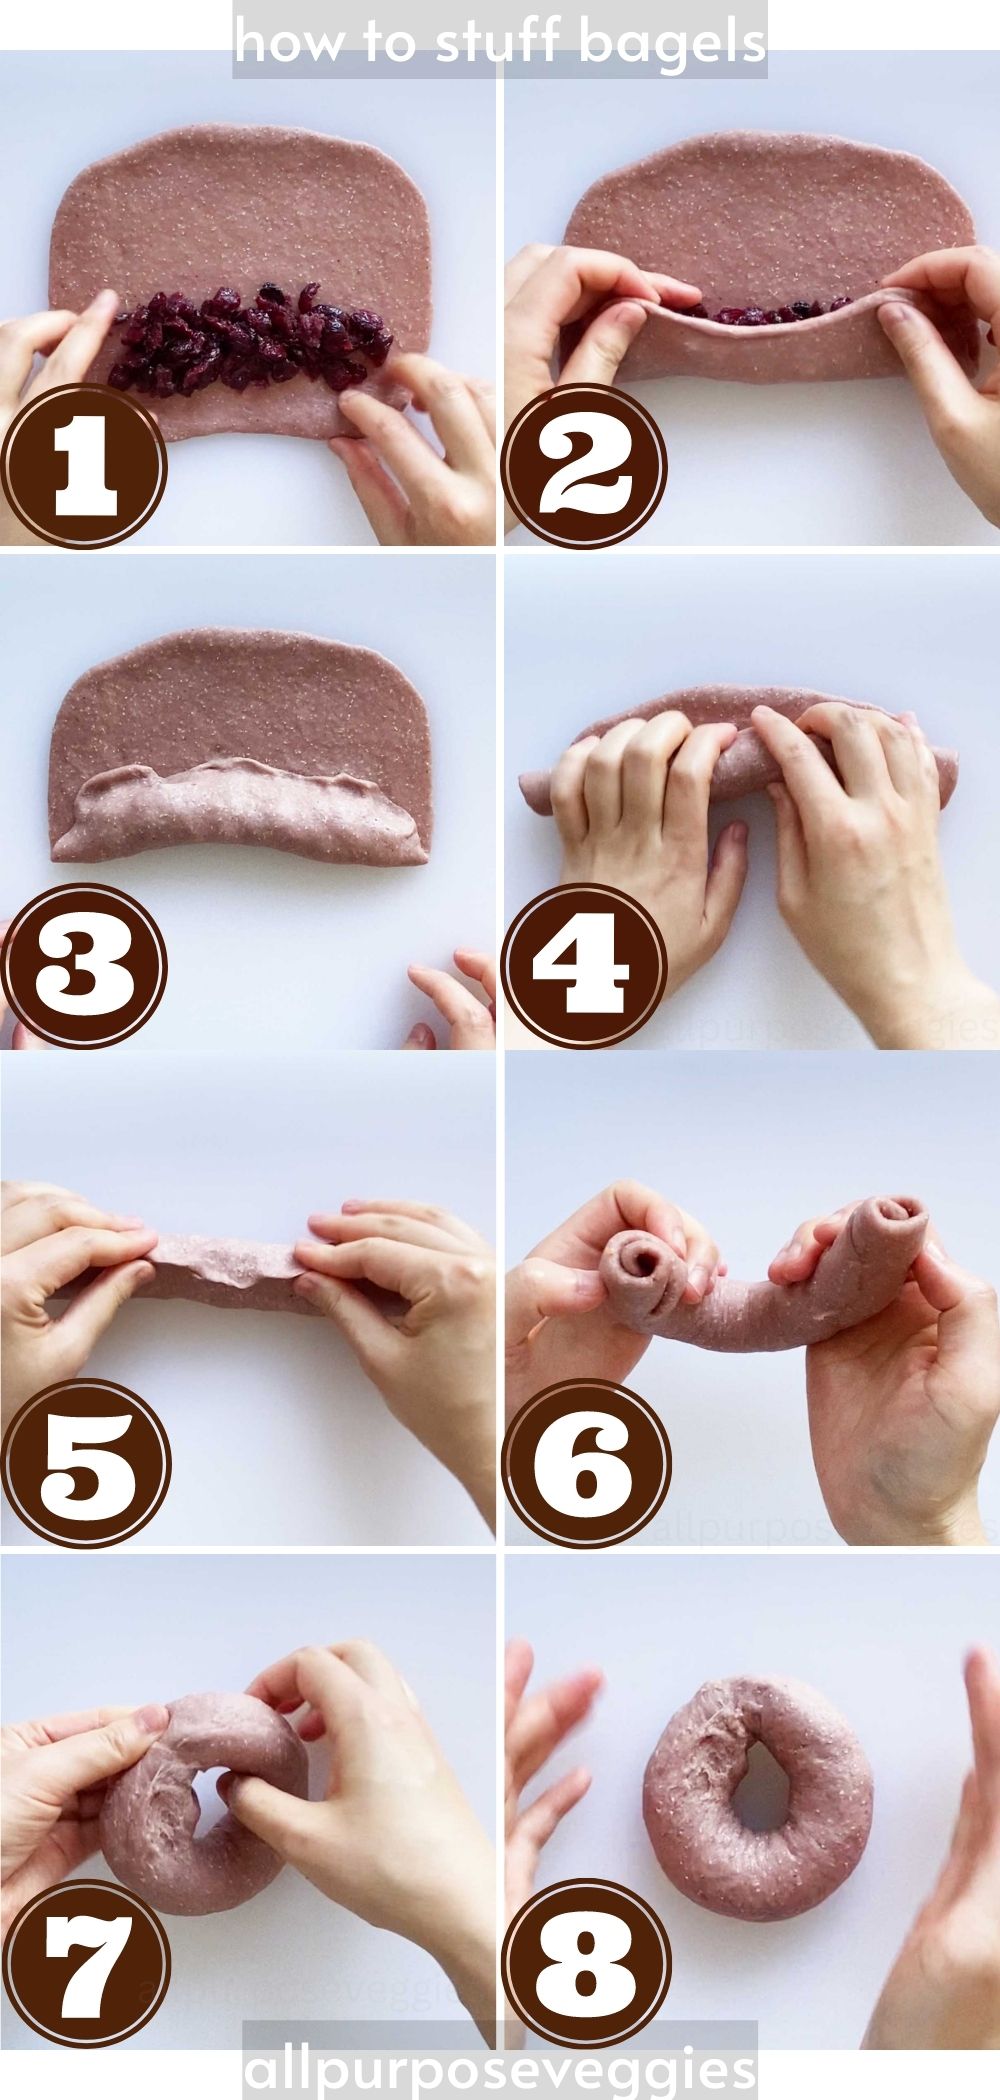
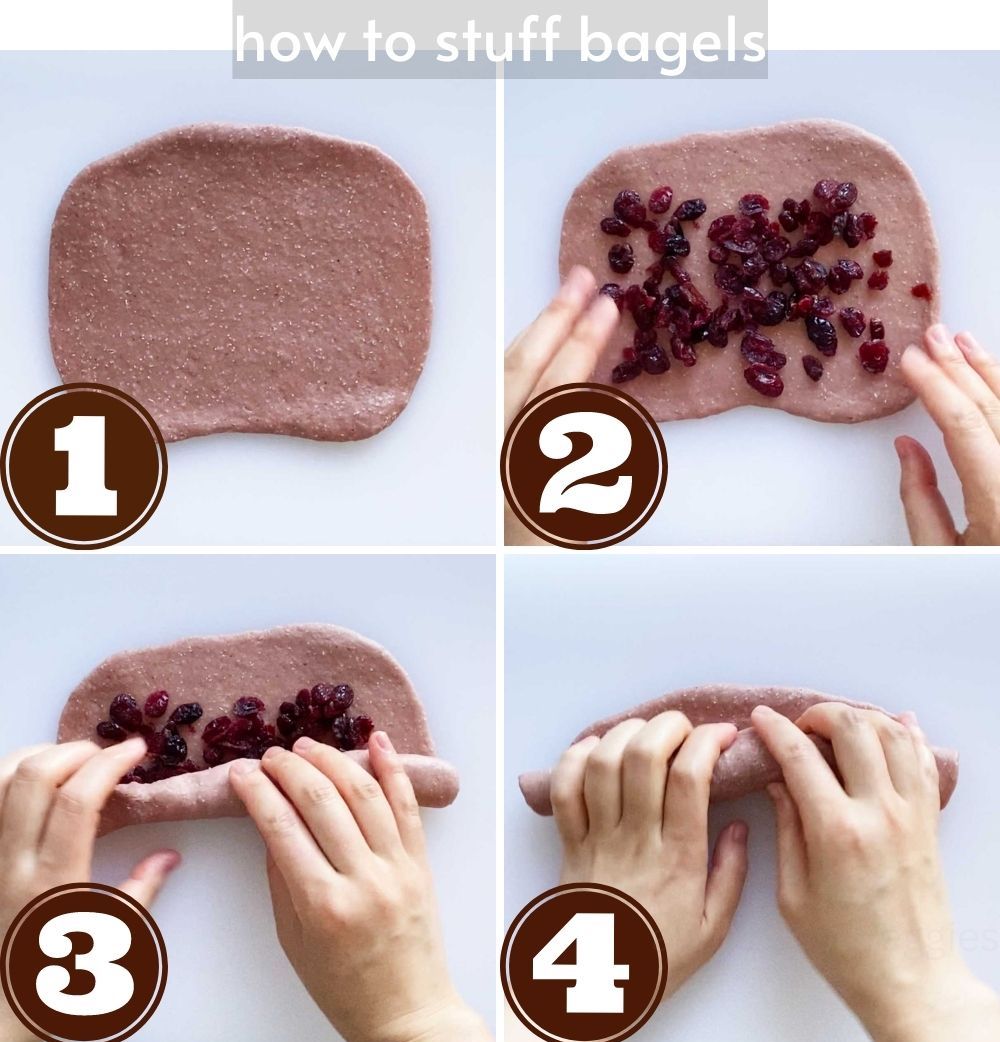
1. Use a rolling pin to roll out each piece of the bagel dough into a thin, 5 x 7 inch rectangle (thinner the better!)
2. Spread about 2-3 Tablespoons of the filling onto the bagel dough.
3-4. Roll the bagel dough over the filling.
5. Seal the ends by pinching the seams of the dough with wet fingers.
6. Bring together the two ends of the bagel dough by inserting one end of the rolled dough into the other end.
7. Pinch the seams together so that they won't fall apart during the boiling process.
8. Loosely cover the shaped bagels with plastic wrap or a clean wet paper towel. Let rise for 40-60 minutes, until the bagels look slightly puffed up.
STEP 8
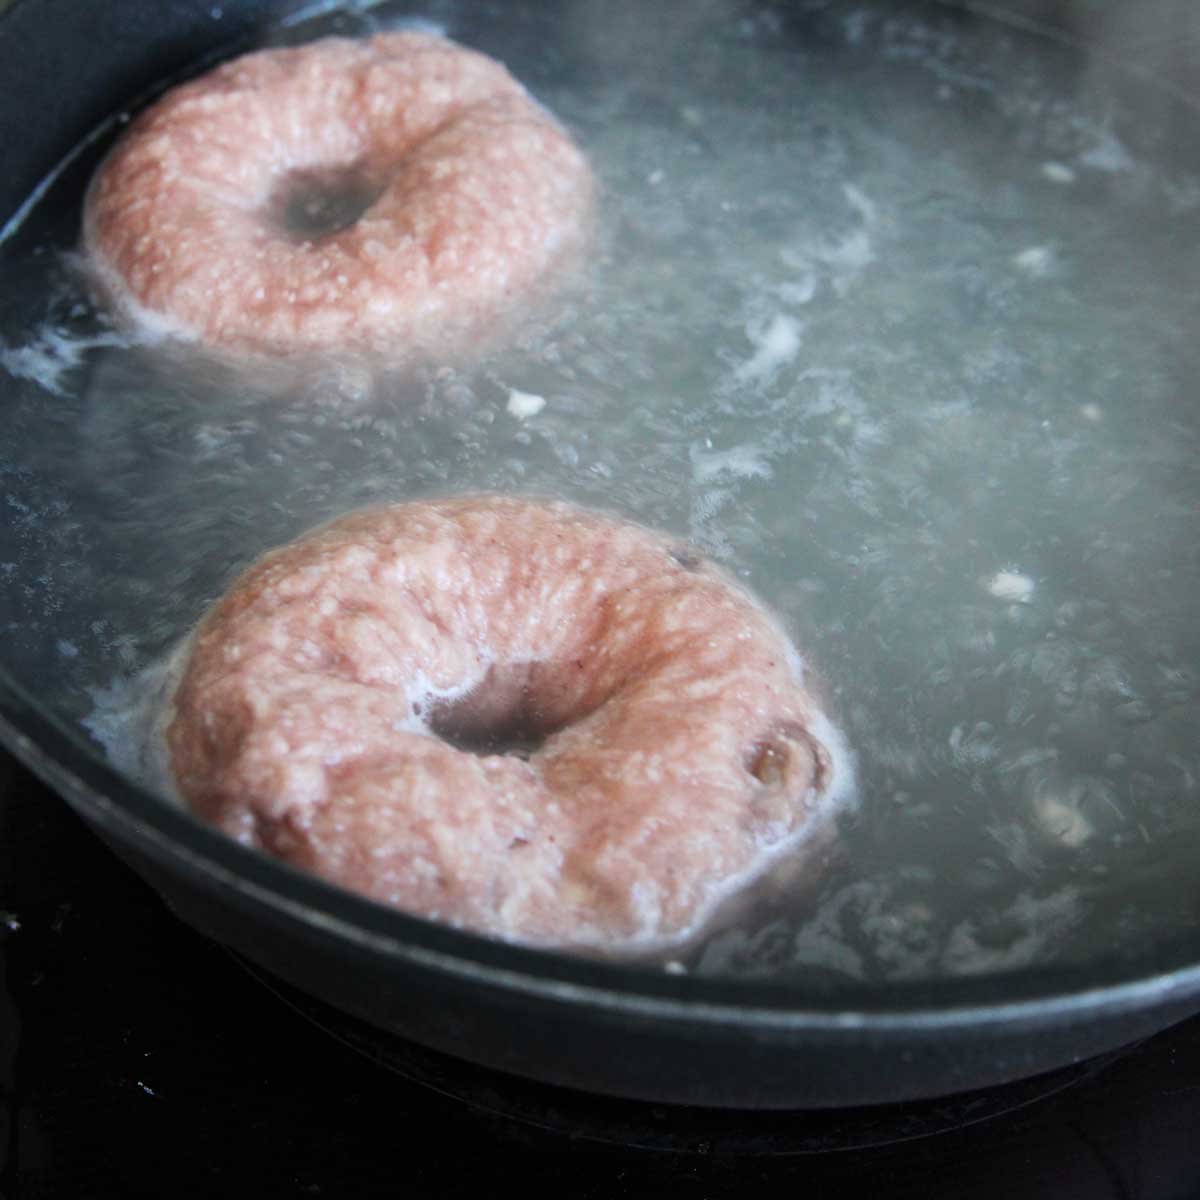
Bring a pot of water to boil. Bring the heat down to medium-hot so that it's gently boiling. Cook the bagel for just 30 seconds on each side.
TIP: If the bagel won't float up to the surface by the end of the 60 seconds, it probably means the bagel needs to proof longer. I usually try this with one bagel first before cooking the other bagels in batches.
STEP 9
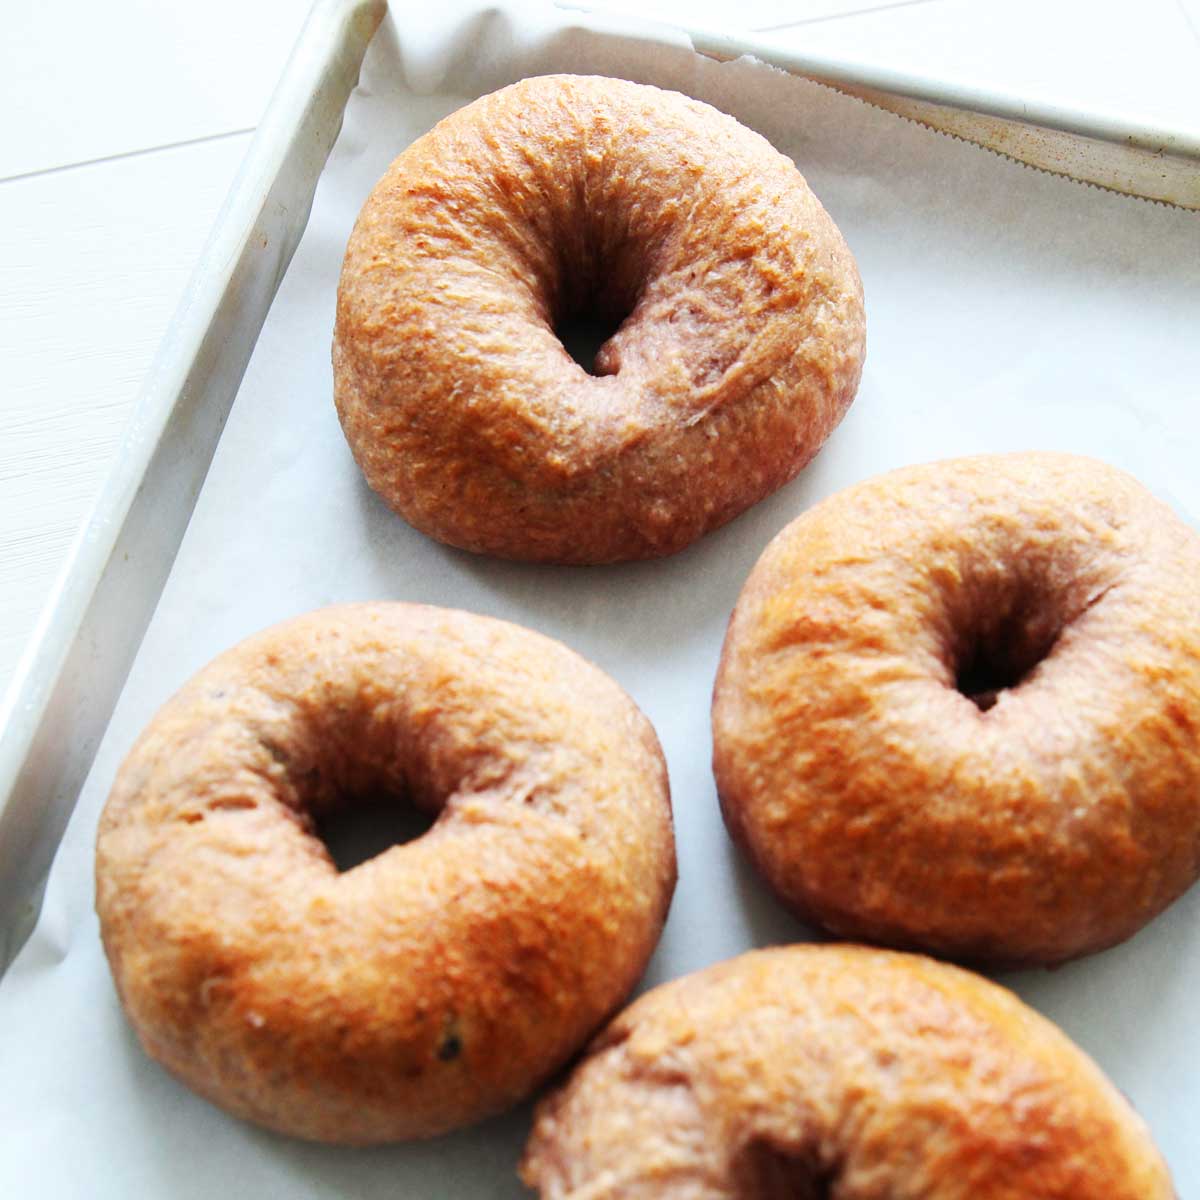
Bake the boiled bagels in the preheated oven for 20-25 minutes, until the tops are glossy and slightly browned.
STEP 10

Let the bagels cool completely before slicing. Enjoy!
Recipe Variations and Optional Add Ins:
Here are some awesome ways you can make this bagel recipe your own 🙂
- Add more texture! Adding chopped nuts, seeds, or dried fruits or oats is a fantastic way to increase the nutrition and flavor in breads, including this one. If you're feeling indulgent, you can also add chocolate chips.
- Want to add more fiber? Substitute white whole wheat flour for up to half of the bread flour called for in this recipe. You'll need to add a few more tablespoons of water to adjust the hydration since whole wheat flour absorbs more water than white flour.
- Go Unstuffed! If you prefer bagels without any stuffing you can always just make these bagels without any filling, like below.
More Bagel Stuffing Ideas:
- Make these bagels healthier by adding a handful of nuts, seeds and old-fashioned oats to add texture and nutrition. Here are some ideas
- Nuts - chopped walnuts, pecans, cashews
- Seeds - poppy seeds, pumpkin seeds, sunflower seeds, sesame seeds, flaxseeds or chiaseeds
- Other Dried Fruit - chopped apricot, raisins, cranberries, dried cherries, candied ginger, citrus zests, etc.
How to get the Swirled Filling Effect


Note on Substitutions
- Unfortunately, gluten-free flours cannot be substituted for bread flour in this recipe.
- If you don't have bread flour, you can also use All Purpose Flour instead. AP flour has less protein than bread flour, so it will yield softer bagels with less chew/ bite.
- As I mentioned in the Ingredients Section, almond flour makes these bagels more flavorful and more nutritionally balanced, but it also makes the bagels less chewy (and more tender). If you prefer a traditional bagel texture, use ¼ cup of bread flour instead of ½ cup of almond flour.
- The almond flour can be subbed with other nut flour like pecan, cashew and walnut flour.
How to Store Stuffed Cranberry Bagels
- For unstuffed bagels, or bagels stuffed with dried fruit/nuts only, you can store these bagels in an airtight container at room temperature for up to 3-4 days.
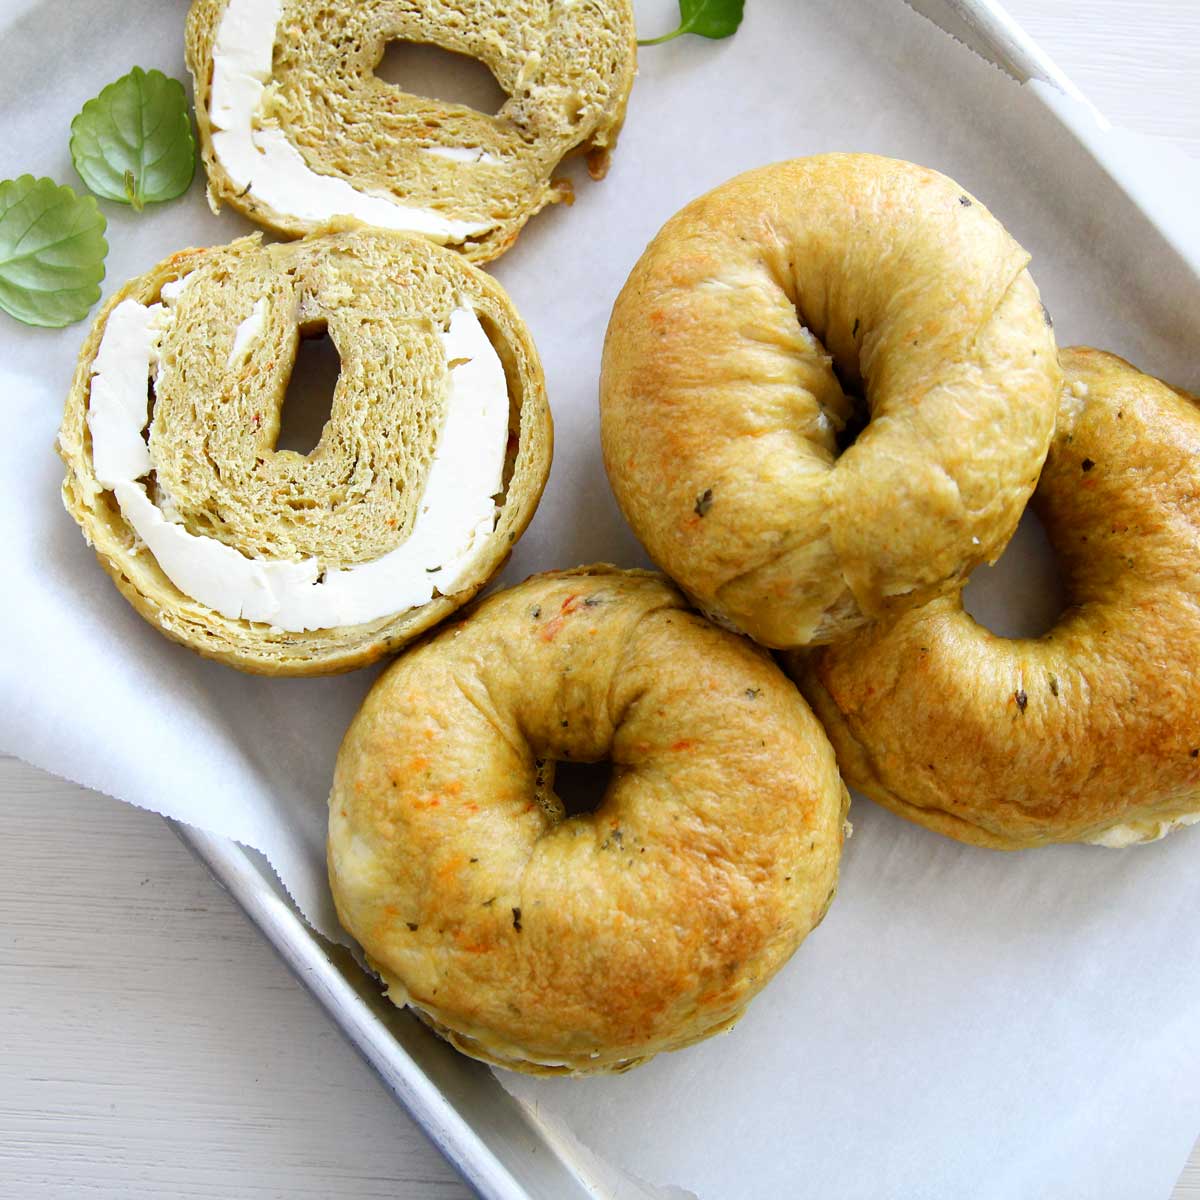
- For bagels with cream cheese filling, these bagels can be out at room temperature for a maximum of 1 day. For longer storage, you can place the bagels in a plastic freezer bag or airtight container and keep them in the fridge for up to 7 days, or in the freezer for up to 3 months. To reheat, toast inside an air fryer or toaster with the filling side up.
Final Tips
- Weigh your flour for the best results. 1 cup of bread flour = 120 grams / 4.23 oz. This is recommended since scooping the flour directly from the bag can pack the flour into the measuring cup, and this means you'll end up with more flour than what's called for in the recipe. If you don't have a kitchen scale, you can measure the flour by spooning pre-sifted flour into the measuring cup, then using the straight end of the spoon to level the flour across the top to sweep off the excess.


Stuffed Cranberry Bagels With Canned Cranberry Sauce
Ingredients
Bagel Dough Ingredients
- 3 ½ cup bread flour 420 g
- 1 cup almond flour 108 g, or use ½ cup (60g) of bread flour for traditional bagel texture. READ NOTES!*
- 5 tsp instant yeast 15 g
- ½ tsp salt 6 g
- 14 oz canned jellied cranberry sauce 397 g
- ¼ cup water 85 g
Filling Ingredients
- 1 packed cup dried cranberries , soaked in water for 10 minutes for a softer cranberry filling
Instructions
Combine the Dough Ingredients
- In a clean mixing bowl, mix the dry ingredients: the bread flour, almond flour, instant yeast, and salt.
- Add cranberry sauce, and use a fork to mash the cranberry sauce into the dry ingredients best you can.
- Next, add water, 1 tablespoon at a time, until all ingredients are combined. *the bagel dough is supposed to be firm and somewhat stiff, since bagels require a lower water-to-flour-ratio. You can add additional 1-2 Tablespoons of water if there are still dry ingredients, but be sure to add one tablespoon at a time, so you don’t overhydrate the dough.
- No kneading is required at this time. Loosely cover the dough with a clean wet towel or plastic wrap.
- Let rise, at a slightly warm place, for 60-90 minutes, until puffy.
After the First Rise (Choose ONE method below)
- For no-knead (overnight) method: gently deflate the dough, and cover the bowl with plastic wrap loosely so that air can escape. Transfer the bowl to the fridge and chill overnight, at least for 8 hours and up to 48 hours.
- For kneaded (quick) method: continue to knead the dough by hand or using a stand mixer, until the dough becomes smooth, supple, and pulls easily away from the bowl. The kneading should not take too long (about 3 minutes by hand) since we allowed the dough to relax and hydrate in the previous step.
Shaping the Dough
- Gently place the prepared dough onto a floured surface. If you chilled the dough in the fridge overnight, let the dough first come to room temperature (about 3-4 hours) before proceeding to the next step.
- Shape the dough into a ball, and divide into 4 equal sized pieces
Filling the Bagel Dough
- Use a rolling pin to roll out each piece of the bagel dough into a thin, 5 x 7 inch rectangle (thinner the better!)
- Spoon about 2-3 Tablespoons of the cranberries onto the bagel dough.TIP: For a thick cresent-shaped filling, place the filling towards one end of the rectangle. For a swirled effect, spread the filling throughout the dough so that it is evenly distributed.
- Roll the bagel dough over the filling, and seal the ends by pinching the seams of the dough. TIP: wet your fingers with some water to help with the sealing
- Bring together the two ends of the bagel dough by inserting one end of the rolled dough into the other end and pinching the seams together so that it won't fall apart during the boiling process.
- Place the stuffed bagels on a parchment lined baking pan, and loosely cover with plastic wrap or clean wet paper towel.
- Let rise for 40-60 minutes, until the bagels look slightly puffed up.
Boil the Bagels
- Bring a pot of water to boil. Bring the heat down to medium-hot so that it's gently boiling.Also, preheat the oven to 350F
- Use a wide slotted spoon or spatula to gently transfer 1 bagel into the water.
- Cook the bagel for just 30 seconds on each side. TIP: If the bagel won't float up to the surface by the end of the 60 seconds, it probably means the bagel needs to proof longer.
- Take the bagel out of the boiling water using a wide slotted spoon or spatula and back to the parchment lined baking sheet.
- Repeat the boiling process for the rest of the bagels.
Bake the Bagels
- Bake the boiled bagels in the preheated oven for 20-25 minutes, until the tops are glossy and slightly browned.
- Let cool to room temperature before serving. TIP: If slicing the bagels crosswise, you'll get the cleanest cut if the bagels (and the filling) are completely cooled.


Leave a Reply