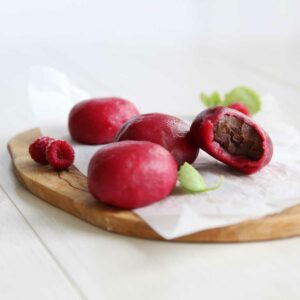
Vegan Raspberry Chocolate Mochi with Chocolate Hazelnut Filling
Ingredients
Mochi Ingredients
- ½ cup mochiko flour, sweet rice or glutinous rice flour about 70 g
- 2 Tbsp granulated sugar , or a sugar free alternative, such as granulated monk fruit sweetner
- ⅔ cup frozen raspberries, thawed , or ½ cup of raspberry puree
Filling
- 6 Tbsp chocolate hazelnut spread of choice , or other mochi filling of choice (see notes for tips*)
Instructions
Make the Mochi Dough
- Prep the raspberry puree by blending the raspberries (thawed if frozen) in a small blender. Remove the seeds from the puree by scraping the puree over a fine-meshed sieve. NOTE: ⅔ cup of raspberries will yield about ½ cup of raspberry puree
- In a microwaveable glass bowl (like Pyrex), mix the glutinous rice flour, sugar and the raspberry puree.
- Microwave the mochi mixture for 90 seconds.
- Use a SOLID METAL spoon (wooden spoons might break!) to stir the cooked mochi so that the cooked and uncooked parts are evenly mixed
- Microwave the mochi mixture again, this time for 60 seconds.
- Pour the cooked mochi onto the baking pan lightly greased with oil, and flatten using the palm of your hands once it cools enough to handle. The mochi dough will be HOT. Either use gloved hands, or wait until it cools enough to handle.
- Cut the mochi into 6 pieces using kitchen shears or scissors
Wrap with Filling
- Wrap the mochi pieces around the prepared filling (about 1-2 Tablespoon sized portions of chocolate hazelnut spread ), and pinch the ends of the mochi dough to seal.TIP: Use a small cookie scoop to easily portion out the filling to be used in the mochi
- Enjoy!
Notes
*For softer mochi fillings like Nutella (or Nutiva for a vegan-friendly version), it helps to pre-portion out the filling and keep it in the freezer for 1-2 hours before use. The frozen filling is easier to handle and will keep your hands mess-free.
You can also try other mochi fillings in this recipe, such as store-bought red bean paste or white bean paste (shiro an). Here is a useful list of 10+ mochi filling ideas.
Nutrition
Calories: 171kcalCarbohydrates: 28gProtein: 2gFat: 6gSaturated Fat: 5gPolyunsaturated Fat: 0.1gMonounsaturated Fat: 0.1gSodium: 8mgPotassium: 106mgFiber: 2gSugar: 15gVitamin A: 5IUVitamin C: 3mgCalcium: 25mgIron: 1mgZinc: 0.4mg***Net Carbs: 26g
Did You Like this Recipe?I'd love to know more about it! Please leave a rating or comment below so I know what to add and which recipes to share with you next!